How to Balance Water Heater Thermostat Temperatures for Optimal Performance
Water heaters commonly feature two essential components known as thermostats, which play a pivotal role in regulating water temperature. The upper thermostat is responsible for heating water to the set temperature before the lower thermostat takes over to maintain that level. This dual-thermostat system ensures that water is heated efficiently, providing immediate access to hot water when needed.
The upper thermostat generally works by activating the heating element when the water temperature falls below the desired level. Conversely, the lower thermostat maintains the water temperature while receiving assistive signals from the upper unit. This intricate coordination not only preserves energy but also guarantees a consistent supply of hot water throughout the household.
However, improper balance between these thermostats can lead to various issues, negatively affecting the performance of your water heating system. For instance, if the upper thermostat is set significantly higher than the lower one, it can result in overheating, which may cause scalding injuries or damage to the water heater itself. On the other hand, if the lower thermostat fails to activate properly, it can lead to insufficient heating, leaving users without hot water when required.
Regular maintenance and periodic checks of the thermostats can help ensure they function effectively. Common indicators of thermostat imbalance may include fluctuating water temperatures or excessively long heating times. By understanding the roles of these thermostats and maintaining them properly, homeowners can enhance the overall efficiency and longevity of their water heater, ensuring a steady supply of comfortable hot water for daily use.
Why Balancing Thermostat Temperatures is Important
Balancing the thermostat temperatures in your water heater plays a fundamental role in ensuring its optimal performance. When the upper and lower thermostat settings are appropriately adjusted, homeowners can benefit significantly from enhanced energy efficiency. A well-balanced system operates at a consistent temperature, reducing the energy required to heat water, ultimately leading to lower utility bills. The importance of managing these settings cannot be overstated, as improper balancing can cause unnecessary energy consumption, resulting in inflated costs over time.
Furthermore, an accurately balanced thermostat setup can be instrumental in minimizing the risk of scalding injuries. Water that is heated to excessively high temperatures can pose serious safety hazards, particularly for children and elderly individuals. By maintaining a moderate temperature range between the upper and lower thermostats, homeowners can ensure that the water reaches a safe yet effective temperature for daily use, thereby enhancing household safety.
Moreover, a well-maintained water heater system contributes to its longevity. Continuous operation at incorrect temperatures can lead to undue strain on the water heater components, resulting in premature wear and higher maintenance requirements. When the thermostat temperatures are effectively balanced, the water heater not only operates more efficiently but also sustains its functionality and lifespan, reducing the likelihood of costly repairs or replacements. This proactive approach to water heater management translates to increased reliability and performance, making it a prudent consideration for homeowners.
In essence, balancing the thermostat temperatures is a critical measure for achieving energy efficiency, minimizing safety risks, and prolonging the life of the water heater. By addressing these factors, homeowners can ensure optimal performance and reap the financial benefits associated with effectively managed thermostat settings.
Step-by-Step Guide to Adjusting Thermostat Settings
Adjusting the thermostat settings on your water heater is essential for optimal performance and energy efficiency. Follow this step-by-step guide to ensure a safe and effective adjustment. First, gather the necessary tools: a screwdriver (flat or Phillips depending on your thermostat), a multimeter, and a towel for any potential spills.
Before starting, safety should be your top priority. Turn off the power supply to the water heater by locating the circuit breaker. This prevents any risk of electrical shock during the adjustment process. Allow the tank to cool down, as extremely hot water can pose a hazard.
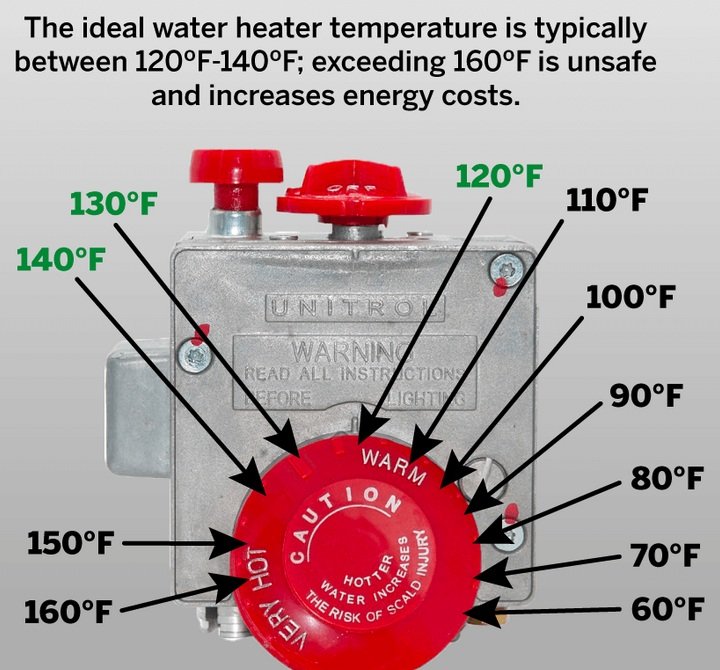
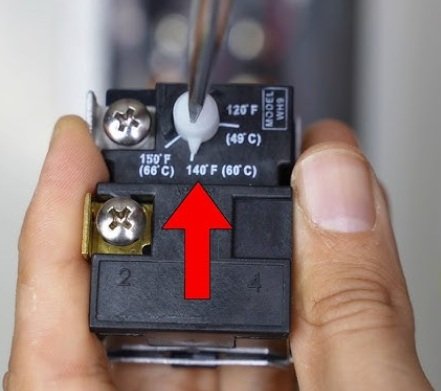
Now, locate the access panel on your water heater. Remove the screws using your screwdriver. You will find two thermostats—upper and lower—each with a temperature dial. It is usually recommended to set the upper thermostat between 120°F to 140°F and the lower thermostat slightly lower, around 100°F. To adjust the temperature, simply turn the dial to your desired setting.
After adjusting, replace the access panel and secure it with screws. Restore power to the water heater by flipping the circuit breaker back on. Wait a few hours for the water to reach the new temperature settings. It is advisable to check the temperature using a multimeter or temperature gauge to ensure accuracy.
If you encounter issues like inconsistent water temperature or fluctuations, verify that the thermocouple is working properly. Additionally, check for sediment buildup in the tank that may affect performance. Regular maintenance and periodic adjustments are key for sustained efficiency and functionality of your water heater.
Maintaining Your Water Heater for Longevity
Proper maintenance of your water heater is vital for ensuring its long-term efficiency and functionality. Regular upkeep not only enhances the longevity of the appliance but also helps prevent unexpected breakdowns. One of the first steps homeowners should consider is routinely checking the thermostat settings. Ideal water temperature should typically be around 120°F (49°C) for optimal performance and safety. Regularly adjusting the thermostat not only conserves energy but also reduces the risk of scalding.
In addition to monitoring thermostat temperatures, flushing the tank periodically is crucial. Sediment accumulation within the tank can hinder performance and lead to corrosion. It is advisable to flush the water heater at least once a year, promoting better heat transfer and prolonging the life of the unit.
Furthermore, inspecting the anode rod every few years can play a significant role in maintenance. The anode rod, made of aluminum or magnesium, prevents rust and corrosion by attracting corrosive elements in the water. If the anode rod is found to be significantly corroded, replacing it can lead to an extended lifespan of the water heater.
Homeowners should also be vigilant for signs that may indicate the need for professional repairs. Unusual noises, rust-colored water, or fluctuating water temperatures are all indicators that your water heater may require expert attention. By identifying these issues early, one can prevent larger problems that could lead to costly repairs or replacements.
In conclusion, by implementing regular checks of thermostat settings, maintaining optimal temperature levels, and addressing signs of malfunction promptly, homeowners can significantly enhance the longevity of their water heater, ensuring it operates efficiently for years to come.