How to Replace Worn Terminal Screws on Your Water Heater: A Step-by-Step Guide
Terminal screws play a pivotal role in the operation of water heaters, serving as the connection points for electrical wiring to the heating elements. These screws ensure that electricity flows efficiently to the heating elements, allowing the water heater to function as designed. Without these crucial components, the overall performance of the water heater may diminish significantly, leading to inadequate heating or complete system failure.
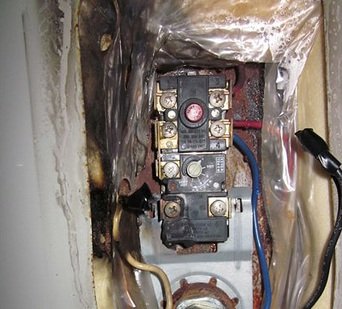
Worn or damaged terminal screws can pose serious risks to both the appliance and the safety of the household. One major concern is the potential for short circuits. When terminal screws become loose or corroded, they can lead to inconsistent electrical connections, which increases the likelihood of arcing. This phenomenon can generate excessive heat, possibly resulting in overheating of the components and ultimately triggering a fire hazard.
Another significant consequence of neglecting worn terminal screws is the inefficiency of the water heater. When these screws do not secure the wiring properly, the energy transfer to the heating elements becomes compromised. This inefficiency may lead to higher energy bills, prolonged heating times, and even an increased frequency of repairs, contributing to unnecessary expenses over time.
Regular inspection and timely replacement of terminal screws are essential for ensuring the safety and functionality of water heaters. By understanding the critical role of terminal screws, homeowners can prioritize maintenance, preventing hazardous situations before they arise. A proactive approach not only safeguards against the risk of electrical failures but also prolongs the lifespan and efficiency of the water heater, contributing to a more reliable household resource.
Tools and Materials Needed for Replacing Terminal Screws
Replacing worn terminal screws on your water heater is a task that requires specific tools and materials to ensure safety and efficiency. First and foremost, a set of screwdrivers is essential. You will need both flathead and Phillips head screwdrivers, as the type of terminal screws may vary by manufacturer. Utilizing the correct screwdriver prevents damage to the screws and allows for easier removal and replacement.
Next on the list are new terminal screws. When purchasing these screws, it is important to select the correct specifications, which can typically be found in your water heater’s manual or by referring to the manufacturer’s website. Opt for corrosion-resistant screws to enhance durability, especially in environments with high humidity.
Pliers are another critical tool for this process. They assist in gripping and maneuvering the terminal screws, especially if they are tightly secured. Additionally, having a pair of needle-nose pliers can be beneficial in managing screws in tight spaces.
Electrical tape should also be part of your toolkit. Once the screws are replaced, this tape can be used to insulate any exposed wires, minimizing the risk of electrical shock or short circuits. It is essential to ensure that connections are made properly and securely encapsulated.
Another important item is a multimeter. This device allows you to check voltage and continuity, which is vital in confirming that the electrical connections are functioning correctly after the screws have been replaced.
Finally, prioritize safety by wearing proper gear, such as gloves and safety goggles. Protecting yourself from electrical hazards is crucial during this repair task. By sourcing quality materials and tools, you will set the groundwork for a successful terminal screw replacement process.
Step-by-Step Guide to Replacing the Terminal Screws
Replacing worn terminal screws on your water heater is a straightforward process. By following this detailed guide, you can safely and efficiently complete the task. Always prioritize safety by wearing protective gear and ensuring the workspace is clear.
Step 1: Turn Off Power to the Unit
Before beginning any work on the water heater, ensure that the power is turned off at the circuit breaker. This step is crucial to prevent electric shocks and ensure safety throughout the process. Use a multimeter to double-check that there is no voltage present before proceeding.
Step 2: Drain the Tank (If Necessary)
If your water heater requires maintenance that involves draining it, connect a garden hose to the drainage valve and allow the water to drain completely. Position a bucket or hose to direct water away from the area. Drainage is not always needed for terminal screw replacement, but it can make access easier in certain models.
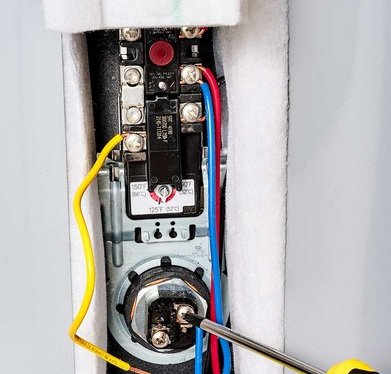
Step 3: Remove the Access Panel
Locate the access panel on the water heater. This panel typically covers the terminal connections. Using a screwdriver, carefully remove the screws holding the access panel in place and set it aside. Take care not to lose any screws during this process.
Step 4: Disconnect Old Screws
With the access panel removed, gently unscrew the old terminal screws. Be cautious to not damage any wiring during this step. Use a socket wrench or screwdriver, as appropriate. If screws are difficult to remove, apply penetrating oil and allow it to sit for a few minutes.
Step 5: Install New Terminal Screws
Align the new terminal screws with their respective holes. Hand-tighten initially to avoid cross-threading, then tighten securely using the appropriate tool. Ensure all connections are snug but do not overtighten, which could damage components.
By following these steps carefully and methodically, you will successfully replace the terminal screws, ensuring the safety and efficiency of your water heater. Common pitfalls to avoid include neglecting to turn off the power beforehand and misplacing any screws or components during the process. If you encounter any issues, consult the manufacturer’s guidelines for troubleshooting advice.
Post-Replacement Tips and Maintenance to Ensure Longevity
Replacing worn terminal screws on your water heater is a vital maintenance task that can significantly enhance the appliance’s longevity and efficiency. However, the work does not end with the replacement; implementing a regular maintenance schedule is crucial to ensure the water heater continues functioning at optimal levels. To achieve this, routine inspections are key.
First, it is advisable to conduct a thorough inspection of the water heater at least once every three months. During these inspections, check for any signs of wear and tear on various components, particularly around the terminal screws. Inspecting the screws for corrosion or loosening ensures they maintain a firm grip, thereby preventing electrical faults that could lead to further damage.
In addition to regular screw inspections, perform a visual check for leaks in the system. Leaks can lead to significant water damage and indicate underlying issues that may need addressing. If any leaks are detected, it is imperative to take immediate action to repair the source, thus enhancing the water heater’s efficiency and lifespan.
Another essential aspect of routine maintenance is verifying that the screws remain tightly secured. Loose screws can lead to inadequate electrical connections, resulting in increased energy consumption and potential overheating. Hence, it is wise to include screw tightness checks in your maintenance routine.
By following these proactive maintenance practices, you can foster optimal performance from your water heater. This not only extends the appliance’s lifespan but also improves its energy efficiency, thereby translating into cost savings on energy bills. Ultimately, regular maintenance plays a crucial role in preventing unfortunate mishaps while ensuring your water heater operates efficiently for many years to come.