How to Tighten Loose Wiring Connections on Your Water Heater
Secure wiring connections play a crucial role in the overall efficiency and safety of your water heater. When wiring connections are loose, they can lead to several operational issues that not only affect the performance of the unit but also pose potential safety hazards. Over time, vibrations from the heater can cause connections to loosen, resulting in poor electrical contact. This poor contact can lead to overheating, which may cause damage to the heater and could potentially result in electrical fires.
Moreover, loose wiring connections can markedly decrease the efficiency of the water heater. When electrical connections are compromised, the unit may struggle to maintain the desired temperature, leading to longer heating times and increased energy consumption. This inefficiency translates into higher energy bills, as the water heater works harder than necessary to meet household demands.
According to the National Fire Protection Association (NFPA), electrical failures or malfunctions related to wiring cause thousands of fires each year. In fact, nearly 47,000 reported incidents were linked to electrical systems, amounting to billions in property damage. These statistics underline the importance of maintaining secure electrical connections within your water heater to prevent such incidents. Proper wiring ensures that the unit operates safely and efficiently, minimizing the risk of electrical hazards and additional costs associated with inefficient performance.
In summary, ensuring that your water heater has secure wiring connections is essential not only for optimal performance but also for the safety of your home. Regular inspections and maintenance can help identify and rectify any loose connections, leading to a safer and more energy-efficient water heating system.
Identifying Loose Wiring Connections
When dealing with a water heater system, it’s imperative to identify loose wiring connections promptly to ensure optimal performance and safety. One of the most common signs of loose wiring is the presence of unusual noises coming from the unit. These noises may manifest as humming, buzzing, or crackling sounds, indicating that the electrical connections are unstable. If you notice any of these sounds, it is advisable to conduct a thorough inspection.
Another indicator of potential wiring issues is flickering lights, especially if these occur when the water heater operates. Flickering lights suggest that the water heater may be drawing inconsistent power, which can be traced back to loose connections. This inconsistent flow not only affects the water heater’s efficiency but may also lead to further electrical complications.
Moreover, an increase in energy consumption can be a significant warning sign of loose wiring connections. If you observe a sudden and unexplained spike in your energy bills, it may warrant further investigation into your water heater’s electrical connections. Loose wiring can cause the unit to work harder than necessary, leading to increased energy usage.
Before attempting to inspect or rectify any electrical issues, it is crucial to take necessary safety precautions. Always ensure that the water heater is completely powered down before approaching it. Disconnecting the power supply prevents the risk of electrical shock, allowing for a safer inspection of the wiring. Additionally, wearing insulated gloves can provide an extra layer of protection as you proceed with the inspection of the loose wiring connections.
Tools and Materials Needed for the Job
Tightening loose wiring connections on your water heater is a task that requires specific tools and materials to ensure safety and efficiency. First and foremost, a set of screwdrivers will be essential for accessing the wiring compartments of the water heater. Both flat-head and Phillips screwdrivers are typically required, as different screws may be used in the assembly of the unit.
Pliers, particularly needle-nose pliers, are another crucial tool. These pliers will help you manipulate and stabilize wires while you tighten connections. Additionally, wire strippers may be necessary if you find any frayed or damaged wiring that needs to be replaced or repaired.
Electrical tape is a valuable supply for securing and insulating wires after you complete your adjustments. This tape helps to protect against moisture and other hazards, making sure the connections remain safe and operational. For electrical integrity checks, a multimeter is recommended. This device will help you measure voltage, current, and resistance in the wiring, ensuring that everything is functioning correctly after you tighten the connections.
When it comes to obtaining these tools and materials, most hardware stores and home improvement centers carry all the items listed. Online retailers also provide great options for purchasing these tools if you prefer shopping from home. Remember that using safety gear is vital when performing electrical tasks. Safety goggles and insulated gloves will protect you from potential hazards while you work on the wiring.
By gathering the correct tools and materials before beginning your project, you’ll ensure a smoother and safer experience while tightening loose wiring connections on your water heater.
Step-by-Step Guide to Tightening Wiring Connections
Tightening loose wiring connections on your water heater is a crucial maintenance task that can enhance the safety and efficiency of your appliance. Follow this step-by-step guide to ensure your connections are secure and functioning properly.
Step 1: Turn Off Power
Before you begin any work on your water heater, ensure that the power supply is completely turned off. This is typically done at the circuit breaker. For additional safety, use a voltage tester to confirm that there is no electrical current flowing to the unit.
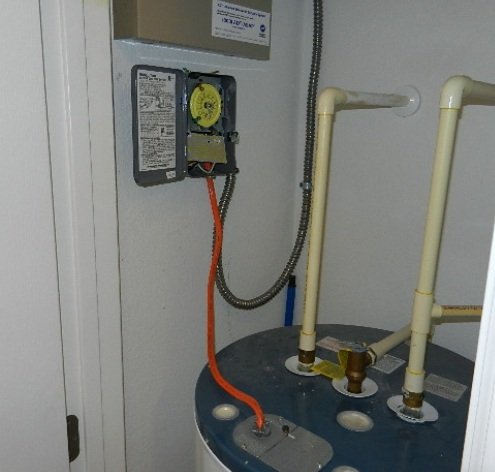
Step 2: Access the Wiring Compartment
Remove the access panel of the water heater to expose the wiring. Depending on the model, this may require the use of a screwdriver. Ensure that you keep the screws in a safe place for reassembly.
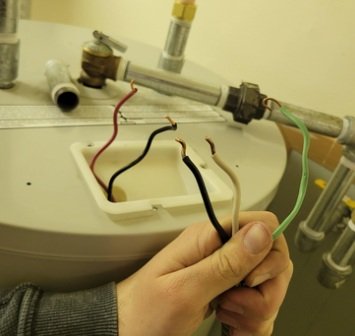
Step 3: Inspect the Wiring
Check for any signs of wear, fraying, or corrosion on the wires. Look specifically at the connections—if any are loose, they will need to be tightened to ensure a secure fit. It is advisable to take photos of the wiring layout before beginning this step, as it can aid in reassembly later.
Step 4: Tighten Connections
Using a screwdriver or wrench, carefully tighten the loose connections. Be cautious not to over-tighten, as this can damage the wires and may lead to further issues. Make certain that each connection is secure and that there is no movement when gently tugged.
Step 5: Test for Continuity
Once everything is tightened, use a multimeter to check for continuity in the wiring. This step ensures that all connections are functioning properly and that there are no breaks in the circuit.
Step 6: Reassemble and Power On
Replace the access panel and secure it with screws. After ensuring everything is back in place, restore power to the water heater from the circuit breaker and monitor the heater’s performance.
Regular maintenance, including checking and tightening connections, is vital to the longevity of your water heater. If you are unsure at any step, consider consulting with a professional electrician to ensure safety and compliance with local codes.